CICD Functions
What can you accomplish GitLab CI/CD?
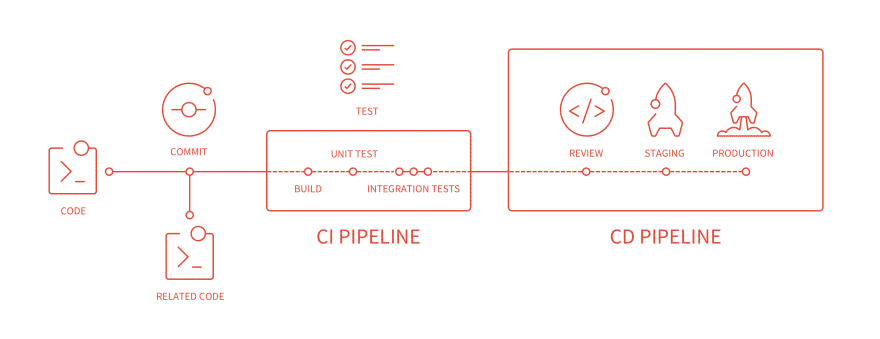
Defining CI/CD
Continuous Integration is the practice of merging all the code that is being produced by developers. The merging usually takes place several times a day in a shared repository. From within the repository, or production environment, building and automated testing are carried out that ensure no integration issues and the early identification of any problems.
Continuous Delivery adds that the software can be released to production at any time, often by automatically pushing changes to a staging system.
Continuous Deployment goes further and pushes changes to production automatically.
CI/CD at GitLab
Continuous Integration (CI) is a way code integrates with shared repositories owned and managed by software development teams. Developers share new code in a Merge Request (“pull request”), triggering a pipeline to build, test, and validate the new code, prior to merging the changes within your repository.
Continuous Delivery (CD) is a practice that ensures the delivery of CI validated code to an application through the orchestration of a structured deployment pipeline. CI and CD must work together seamlessly in order for teams to build fast and effectively, as well placing high priority on the reassurance development practices are optimized fully.
Together, CI and CD accelerate how software teams deliver results to customers and stakeholders. CI helps catch and reduce bugs early in the development cycle, and CD moves verified code to your applications faster.
Benefits of GitLab CI/CD
- Error Detection - Detects errors as quickly as possible: fix problems while they are still fresh in developers mind.
- Increased Efficiency - Reduces integration problems: smaller problems are easier to digest and fix immediately. Bugs won’t shut your whole system down.
- No Snowball Effect - Avoid compounding problems: allows teams to develop faster, with more confidence and collaboration.
- Release Stages - Ensures every change is releasable: test everything, including deployment, before calling it done with less risk on each release.
- Valuable Delivery - Delivers value more frequently: reliable deployments mean more releases
- Better Feedback Processes - Tight customer feedback loops: fast and frequent customer feedback on changes allow for continuous improvement for your product.
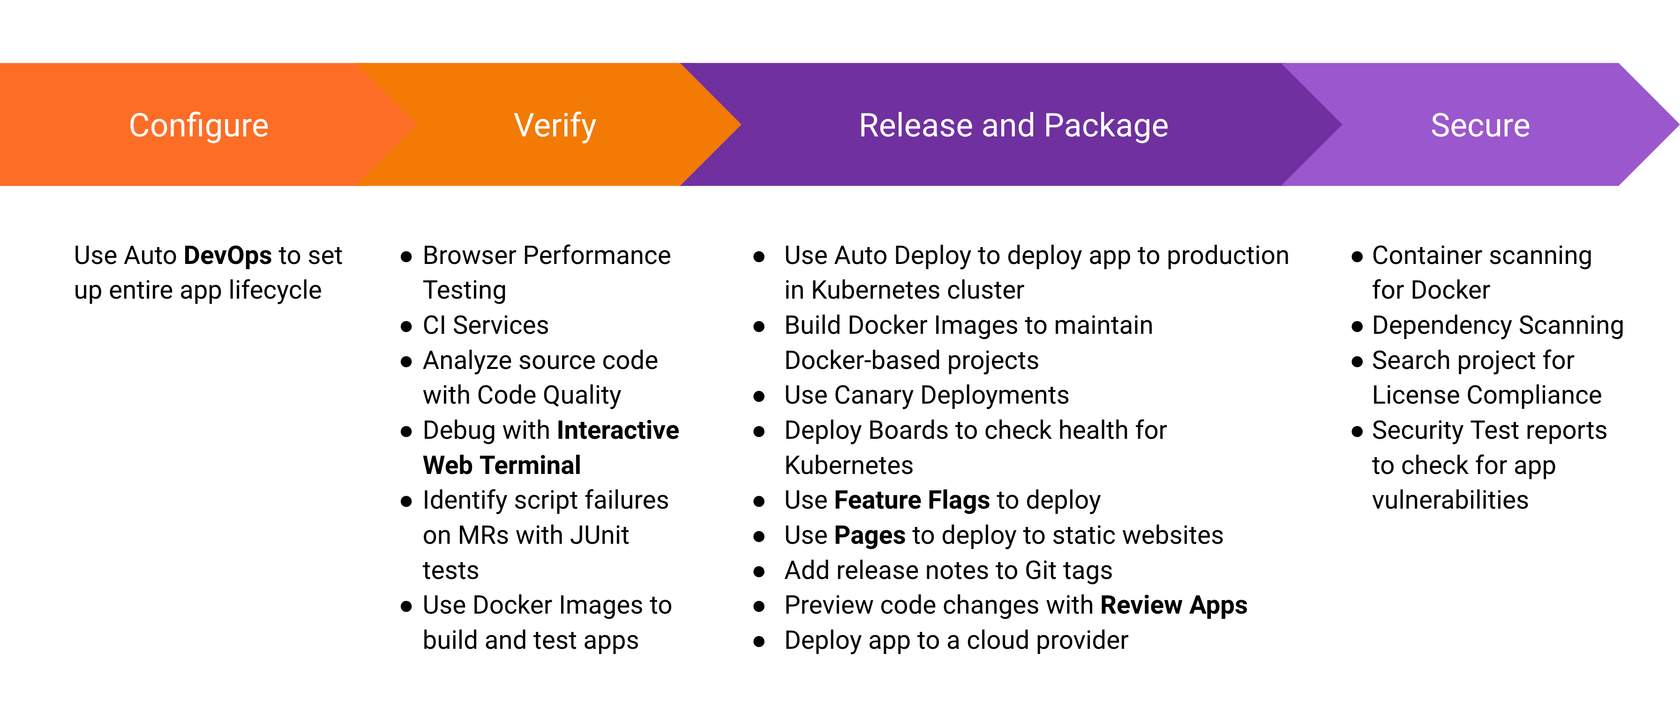
CI/CD Features in GitLab by Lifecycle Stage
Here are the features you can use in GitLab for CI/CD. They are shown according to the stage in the DevOps Lifecycle. Next we’ll look at a few of the key features and how to use them in the Verify, Package, and Release stages of the life cycle. We’ll cover the Secure stage later on today.

GitLab CI/CD Features
There are several different features within the GItLab CI/CD flow. Use the following website to complete the exercise below to indicate whether the feature is available with GitLab or not.
https://about.gitlab.com/stages-devops-lifecycle/continuous-integration/
How GitLab CI/CD Works?
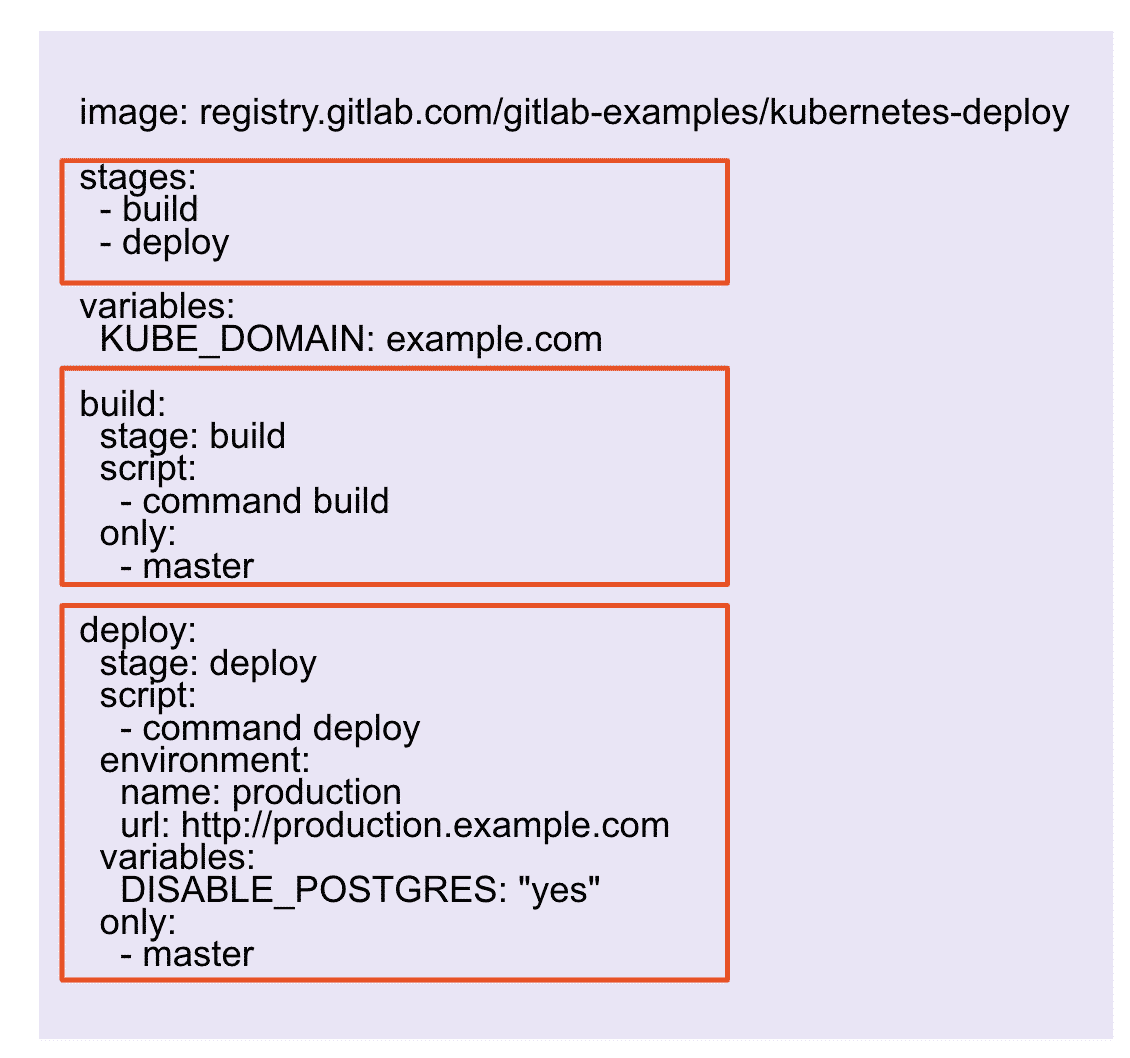
To use GitLab CI/CD, all you need is an application codebase hosted in a Git repository, and for your build, test, and deployment scripts to be specified in a file called .gitlab-ci.yml, located in the root path of your repository.

GitLab CI/CD: Key Ingredients
To use GitLab CI/CD you or your GitLab administrator must first define a pipeline within a YAML file called .gitlab-ci.yml and then install and configure a Gitlab Runner.
-
.gitlab-ci.yml
- The YAML file is the pipeline definition file. It specified the stages, jobs, and actions that you want to perform. Think of the YAML file as the brains, and the runner as the body.
-
Gitlab Runner
- A GitLab Runner, a file written in Go, will run the jobs specified in the YAML file using an API to communicate with GitLab.
- Your GitLab administrator can configure shared runners to run on multiple projects, and you can set up your own by project.

This is what a .gitlab-ci.yaml file looks like at a high-level. YAML is a human-readable data format and standard that can be used in conjunction with all programming languages and is often used to write configuration files. (configuration data)
The YAML syntax is stored in the root of a project and version controlled along with the rest of your code
Anatomy of a CI/CD Pipeline
This is an example of a pipeline graph that shows what the CI/CD build looks like. It lets you see how a set of one or more jobs are executed in the stages you define in the YAML file for the pipeline.

GitLab and AutoDevOps
Auto DevOps gives you a pre-defined CI/CD configuration which lets you automatically detect, build, test, deploy, and monitor your applications. This makes it easier to set up every project more consistently.
It is enabled by default for all of your projects but can be disabled by your administrator at the instance level. It can be disabled and enabled by GitLab.com users at the project level, and self-managed users can also enable it at the group or instance level.
Example CI/CD Pipelines
Now that you have reviewed the basic characteristics of a GitLab CI/CD Pipeline, let’s take a look at some live examples of pipelines using GitLab today.
Example Project 1:
Ruby Auto Deploy - https://gitlab.com/gitlab-examples/ruby-autodeploy
Example Project 2:
Simple Maven App - https://gitlab.com/gitlab-examples/multi-project-pipelines/simple-maven-app
Example Project 3:
AutoDevOps - https://www.youtube.com/watch?v=0Tc0YYBxqi4&ab_channel=GitLab
More Project Examples :
https://gitlab.com/gitlab-examples