Kubernetes Building Blocks
Introduction
- In this chapter, we will explore the Kubernetes object model and describe some of its fundamental building blocks, such as Nodes, Namespaces, Pods, ReplicaSets, Deployments, DaemonSets, etc.
- We will also discuss the essential role of Labels and Selectors in a microservices-driven architecture as they logically group decoupled objects together.
Kubernetes Object Model
-
Kubernetes became popular due to its advanced application lifecycle management capabilities, implemented through a rich object model, representing different persistent entities in the Kubernetes cluster.
-
Those entities describe:
- What containerized applications we are running.
- The nodes where the containerized applications are deployed.
- Application resource consumption.
- Policies attached to applications, like restart/upgrade policies, fault tolerance, ingress/egress, access control, etc.
-
With each object, we declare our intent, or the desired state of the object, in the spec section.
-
The Kubernetes system manages the status section for objects, where it records the actual state of the object.
-
At any given point in time, the Kubernetes Control Plane tries to match the object’s actual state to the object’s desired state.
-
An object definition manifest must include other fields that specify the version of the API we are referencing as the apiVersion, the object type as kind, and additional data helpful to the cluster or users for accounting purposes - the metadata.
-
Examples of Kubernetes object types are Nodes, Namespaces, Pods, ReplicaSets, Deployments, DaemonSets, etc. We will explore them next.
-
When creating an object, the object’s configuration data section from below the spec field has to be submitted to the Kubernetes API Server.
-
The API request to create an object must have the spec section, describing the desired state, as well as other details.
-
Although the API Server accepts object definitions in a JSON format, most often we provide such definition manifests in a YAML format which is converted by kubectl in a JSON payload and sent to the API Server.
Nodes
- Nodes are virtual identities assigned by Kubernetes to the systems part of the cluster - whether Virtual Machines, bare-metal, Containers, etc.
- These identities are unique to each system and are used by the cluster for resources accounting and monitoring purposes, which helps with workload management throughout the cluster.
- Each node is managed with the help of two Kubernetes node agents - kubelet and kube-proxy, while it also hosts a container runtime.
- The container runtime is required to run all containerized workload on the node - control plane agents and user workloads.
- The kubelet and kube-proxy node agents are responsible for executing all local workload management related tasks
- interact with the runtime to run containers
- monitor containers and node health
- report any issues and node state to the API Server
- managing network traffic to containers.
- Based on their pre-determined functions, there are two distinct types of nodes
- control plane
- worker
- A typical Kubernetes cluster includes at least one control plane node, but it may include multiple control plane nodes for Highly Available (HA) control plane.
- In addition, the cluster includes one or mode worker nodes to provide resource redundancy in the cluster. There are cases when a single all-in-one cluster is bootstrapped as a single node on a single VM, bare-metal, or Container, when high availability and resource redundancy are not of importance.
- These are the cases of hybrid or mixed nodes hosting both control plane agents and user workload on the same system.
- Minikube allows us to bootstrap multi-node clusters with distinct, dedicated control plane nodes, however, if our host system has a limited amount of physical resources, we can easily bootstrap a single all-in-one cluster as a single node on a single VM or Container, and still be able to explore most of the topics covered in this course, with the exception of features specific to multi-node clusters, such as DaemonSets, multi node networking, etc.
- Node identities are created and assigned during the cluster bootstrapping process by the tool responsible to initialize the cluster agents.
- Minikube is using the default kubeadm bootstrapping tool, to initialize the control plane node during the init phase and grow the cluster by adding worker or control plane nodes with the join phase.
- The control plane nodes run the control plane agents, such as the API Server, Scheduler, Controller Managers, and etcd in addition to the kubelet and kube-proxy node agents, the container runtime, and possible addons for container networking, monitoring, logging, DNS, etc.
- Worker nodes run the kubelet and kube-proxy node agents, the container runtime, and possible addons for container networking, monitoring, logging, DNS, etc.
Namespaces
- If multiple users and teams use the same Kubernetes cluster we can partition the cluster into virtual sub-clusters using Namespaces.
- The names of the resources/objects created inside a Namespace are unique, but not across Namespaces in the cluster.
- To list all the Namespaces, we can run the following command:
$ kubectl get namespaces

NAME-   STATUS       AGE
default           Active       11h
kube-node-lease   Active       11h
kube-public       Active       11h
kube-system       Active       11h
- Generally, Kubernetes creates four Namespaces out of the box: kube-system, kube-public, kube-node-lease, and default.
- kube-system Namespace contains the objects created by the Kubernetes system, mostly the control plane agents.
- The default Namespace contains the objects and resources created by administrators and developers, and objects are assigned to it by default unless another Namespace name is provided by the user.
- kube-public is a special Namespace, which is unsecured and readable by anyone, used for special purposes such as exposing public (non-sensitive) information about the cluster.
- The newest Namespace is kube-node-lease which holds node lease objects used for node heartbeat data.
- Good practice, however, is to create additional Namespaces, as desired, to virtualize the cluster and isolate users, developer teams, applications, or tiers.
- Namespaces are one of the most desired features of Kubernetes, securing its lead against competitors, as it provides a solution to the multi-tenancy requirement of today’s enterprise development teams.
- Resource quotas help users limit the overall resources consumed within Namespaces, while LimitRanges help limit the resources consumed by Containers and their enclosing objects in a Namespace. We will briefly cover quota management in a later chapter.
Pods
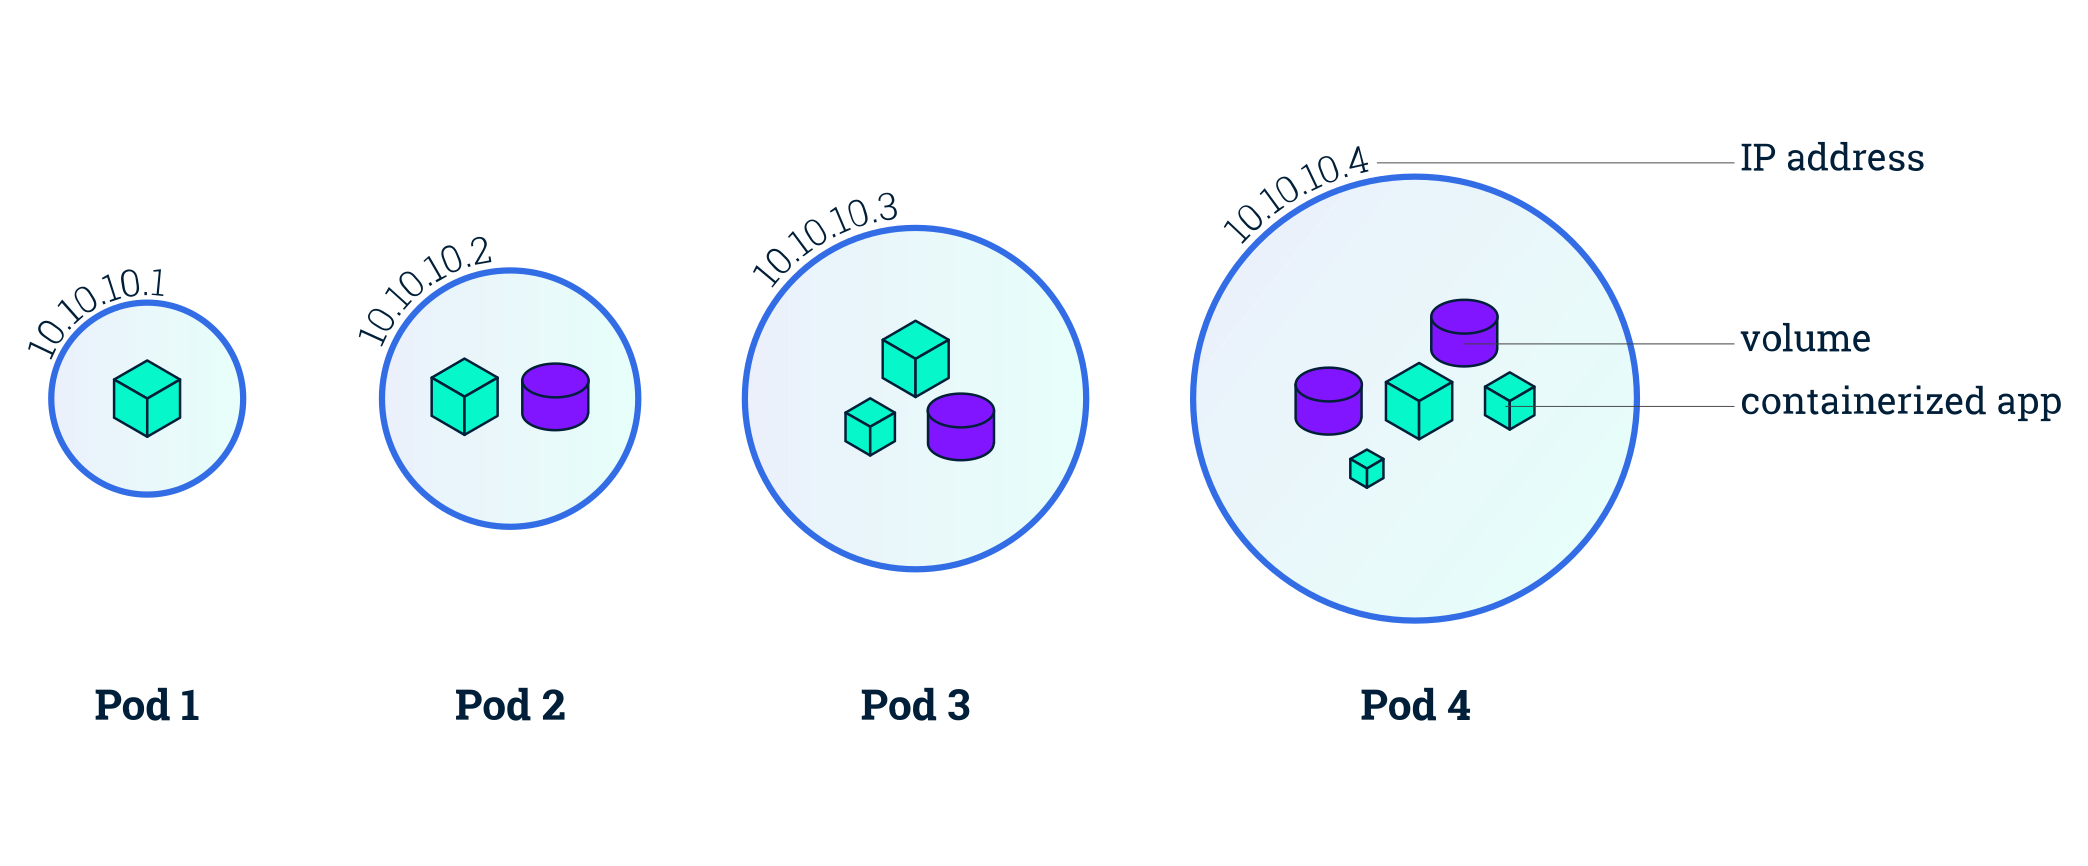
- A Pod is the smallest Kubernetes workload object.
- It is the unit of deployment in Kubernetes, which represents a single instance of the application.
- A Pod is a logical collection of one or more containers, enclosing and isolating them to ensure that they:
- Are scheduled together on the same host with the Pod.
- Share the same network namespace, meaning that they share a single IP address originally assigned to the Pod.
- Have access to mount the same external storage (volumes) and other common dependencies.
- Pods are ephemeral in nature, and they do not have the capability to self-heal themselves.
- That is the reason they are used with controllers, or operators (controllers/operators are used interchangeably), which handle Pods' replication, fault tolerance, self-healing, etc.
- Examples of controllers are Deployments, ReplicaSets, DaemonSets, Jobs, etc. When an operator is used to manage an application, the Pod’s specification is nested in the controller’s definition using the Pod Template.
- Below is an example of a stand-alone Pod object’s definition manifest in YAML format, without an operator:
apiVersion: v1
kind: Pod
metadata:
  name: nginx-pod
  labels:
    run: nginx-pod
spec:
  containers:
  - name: nginx
    image: nginx:1.20.2
    ports:
    - containerPort: 80
- The apiVersion field must specify v1 for the Pod object definition.
- The second required field is kind specifying the Pod object type.
- The third required field metadata, holds the object’s name and optional labels and annotations.
- The fourth required field spec marks the beginning of the block defining the desired state of the Pod object - also named the PodSpec.
- Our Pod creates a single container running the
nginx:1.20.2image pulled from a container image registry, in this case from Docker Hub. - The containerPort field specifies the container port to be exposed by Kubernetes resources for inter-application access or external client access - to be explored in the Services chapter.
- The contents of spec are evaluated for scheduling purposes, then the kubelet of the selected node becomes responsible for running the container image with the help of the container runtime of the node.
- The Pod’s name and labels are used for workload accounting purposes.
How to Run Applications with Pods (Demo)
Labels
- Labels are key-value pairs attached to Kubernetes objects (e.g. Pods, ReplicaSets, Nodes, Namespaces, Persistent Volumes).
- Labels are used to organize and select a subset of objects, based on the requirements in place.
- Many objects can have the same Label(s).
- Labels do not provide uniqueness to objects.
- Controllers use Labels to logically group together decoupled objects, rather than using objects' names or IDs.
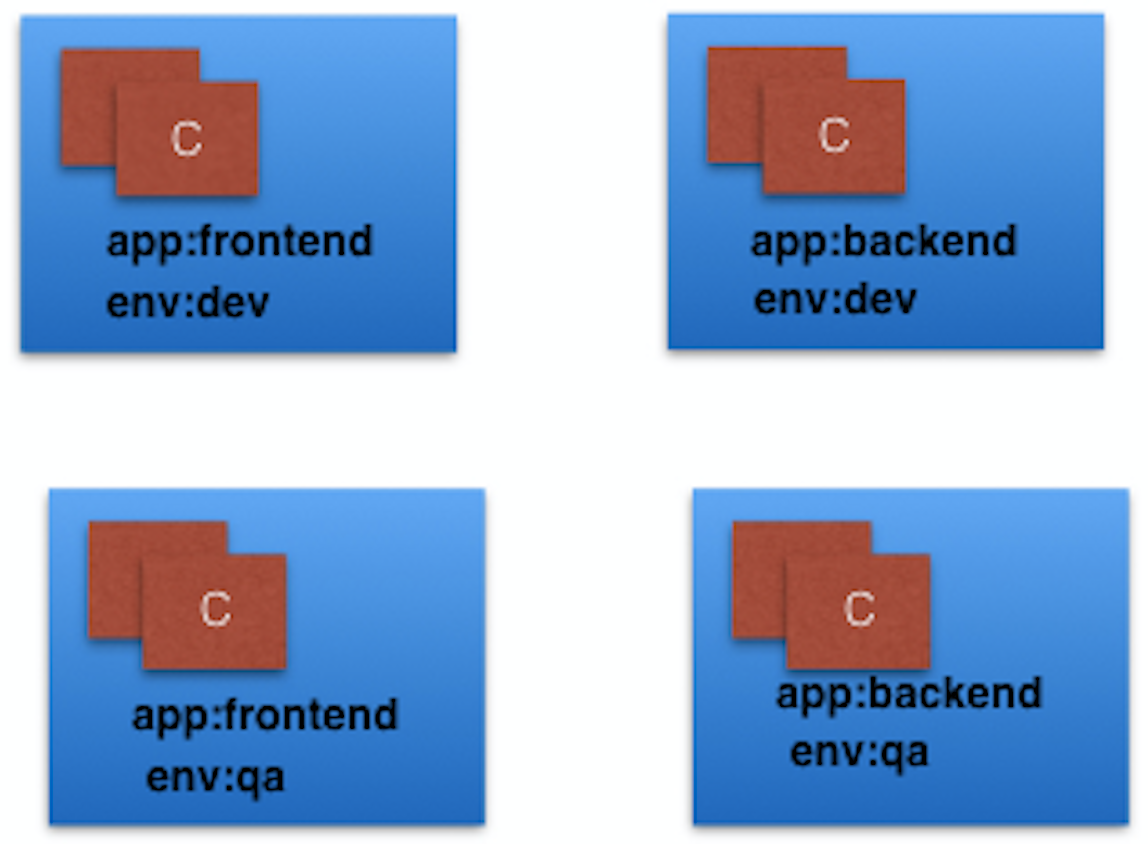
- In the image above, we have used two Label keys: app and env.
- Based on our requirements, we have given different values to our four Pods.
- The Label env=dev logically selects and groups the top two Pods, while the Label app=frontend logically selects and groups the left two Pods.
- We can select one of the four Pods - bottom left, by selecting two Labels: app=frontend AND env=qa.
Label Selectors
-
Controllers, or operators, and Services, use label selectors to select a subset of objects. Kubernetes supports two types of Selectors:
-
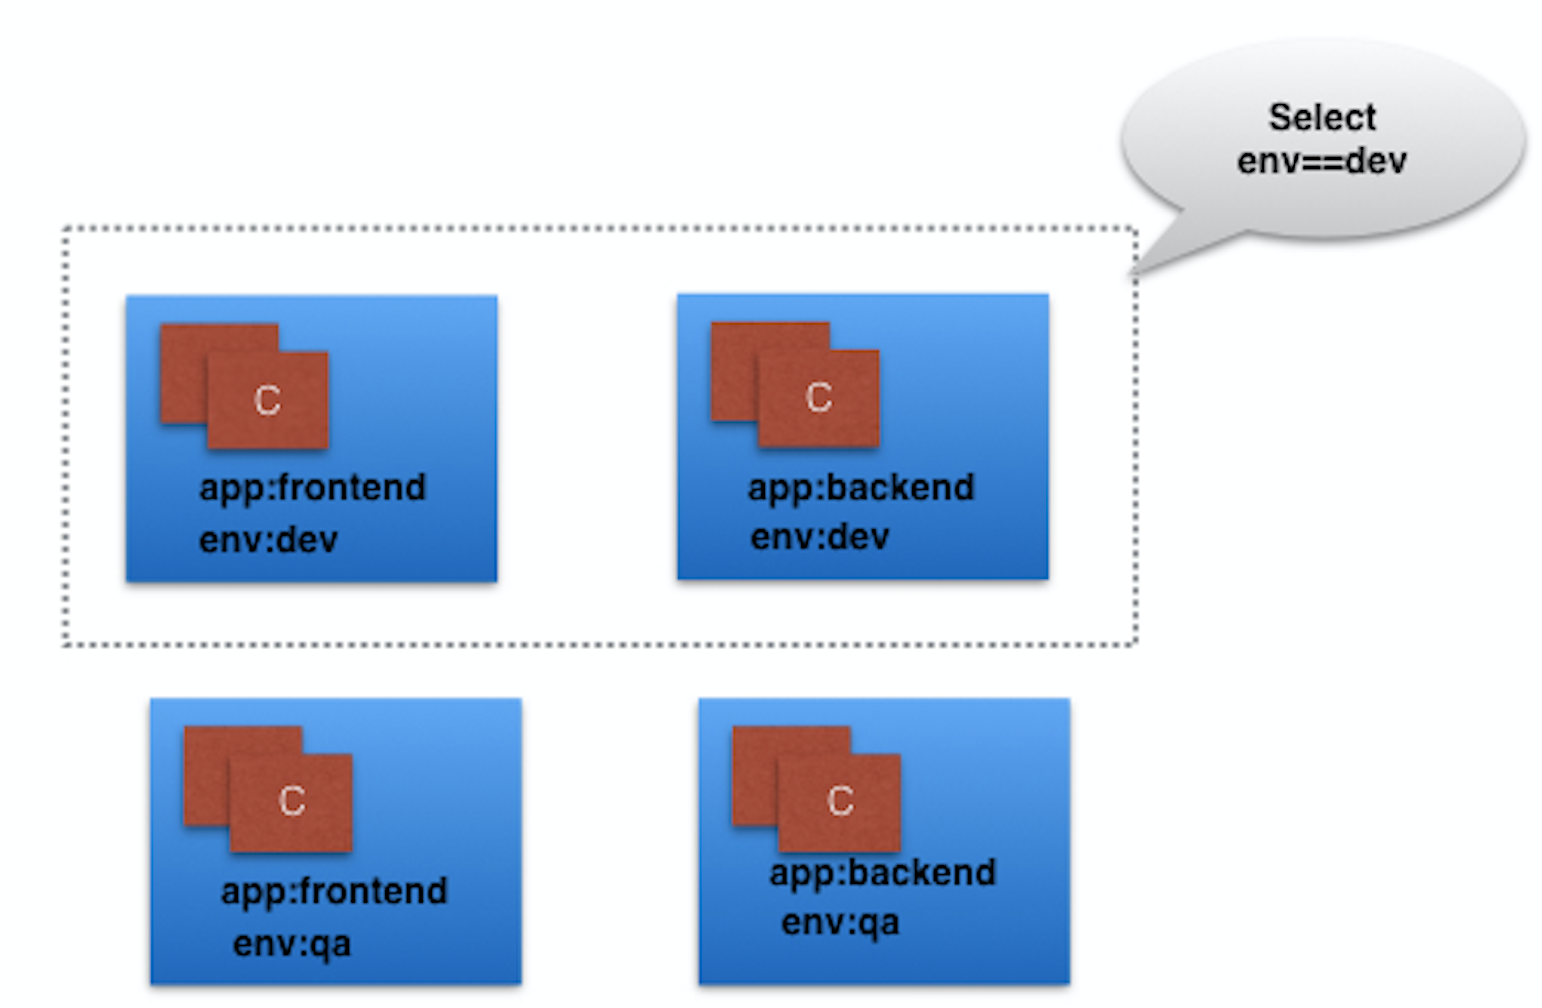
Equality-Based Selectors - Equality-Based Selectors allow filtering of objects based on Label keys and values. Matching is achieved using the
=, ==(equals, used interchangeably), or!=(not equals) operators. For example, with env==dev or env=dev we are selecting the objects where the env Label key is set to value dev. -
Set-Based Selectors - Set-Based Selectors allow filtering of objects based on a set of values. We can use
in,notinoperators for Label values, andexist/does not existoperators for Label keys. For example, withenv in (dev,qa)we are selecting objects where the env Label is set to either dev or qa; with!appwe select objects with no Label key app.
ReplicationControllers
- Although no longer a recommended controller, a ReplicationController is a complex operator that ensures a specified number of replicas of a Pod is running at any given time, by constantly comparing the actual state with the desired state of the managed application.
- If there are more Pods than the desired count, the replication controller randomly terminates the number of Pods exceeding the desired count, and, if there are fewer Pods than the desired count, then the replication controller requests additional Pods to be created until the actual count matches the desired count.
- Generally, we do not deploy a Pod independently, as it would not be able to re-start itself if terminated in error because a Pod misses the much desired self-healing feature that Kubernetes otherwise promises.
- The recommended method is to use some type of an operator to run and manage Pods.
- In addition to replication, the ReplicationController operator also supports application updates.
- However, the default recommended controller is the Deployment which configures a ReplicaSet controller to manage application Pods' lifecycle.
ReplicaSets
- A ReplicaSet is, in part, the next-generation ReplicationController, as it implements the replication and self-healing aspects of the ReplicationController.
- ReplicaSets support both equality- and set-based Selectors, whereas ReplicationControllers only support equality-based Selectors.
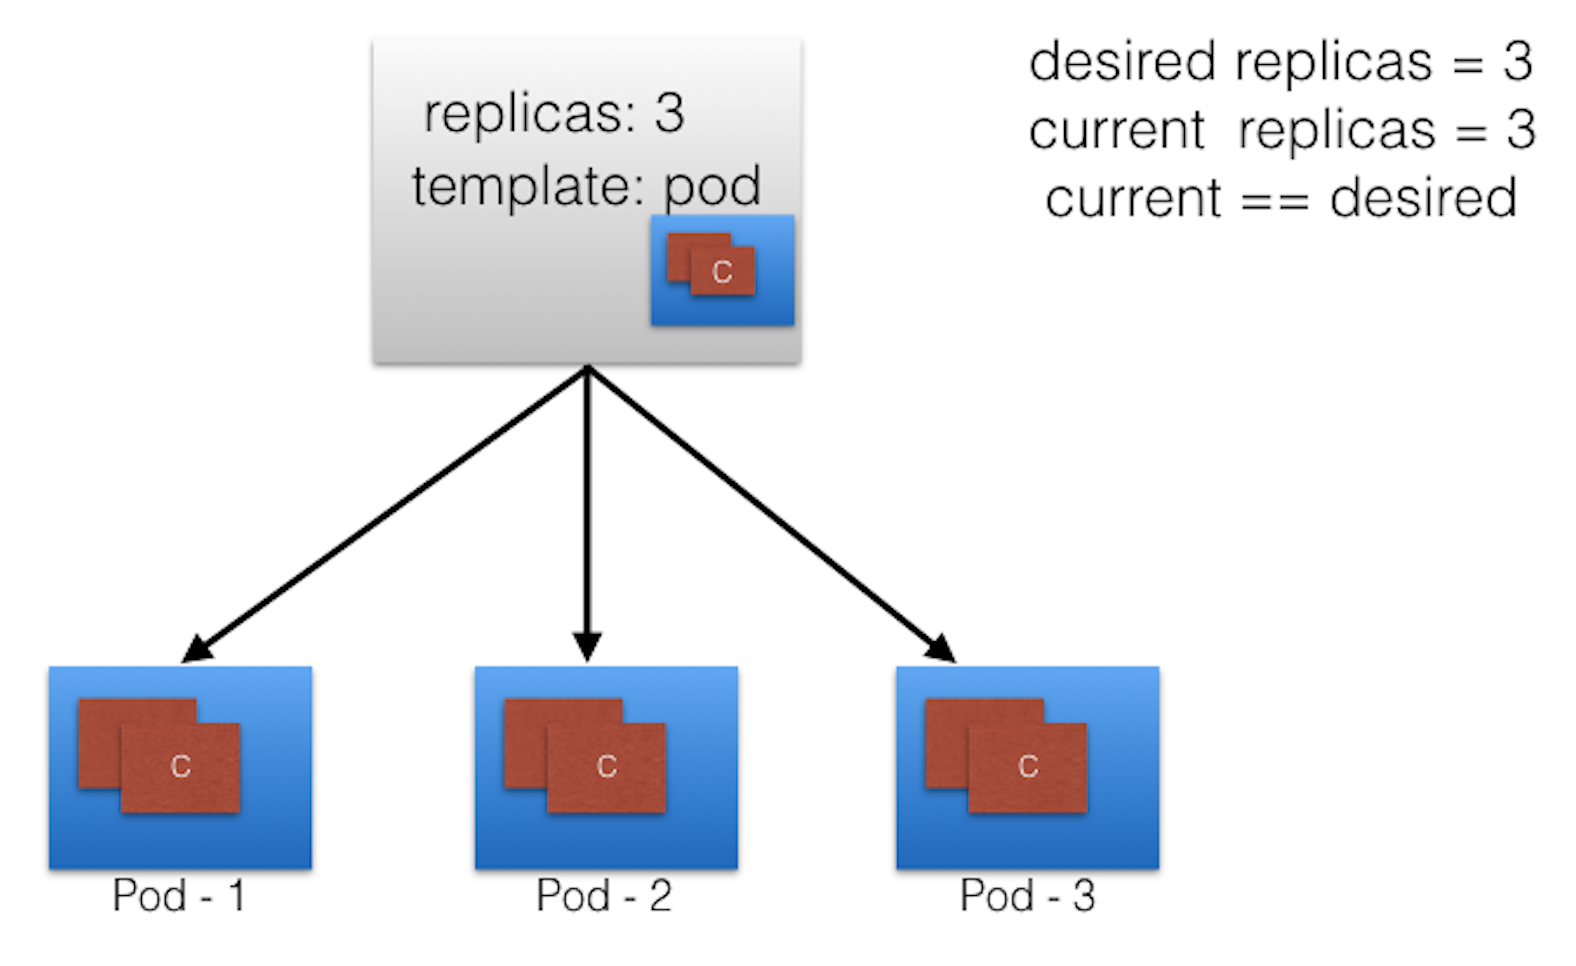
- With the help of a ReplicaSet, we can scale the number of Pods running a specific application container image. Scaling can be accomplished manually or through the use of an autoscaler.
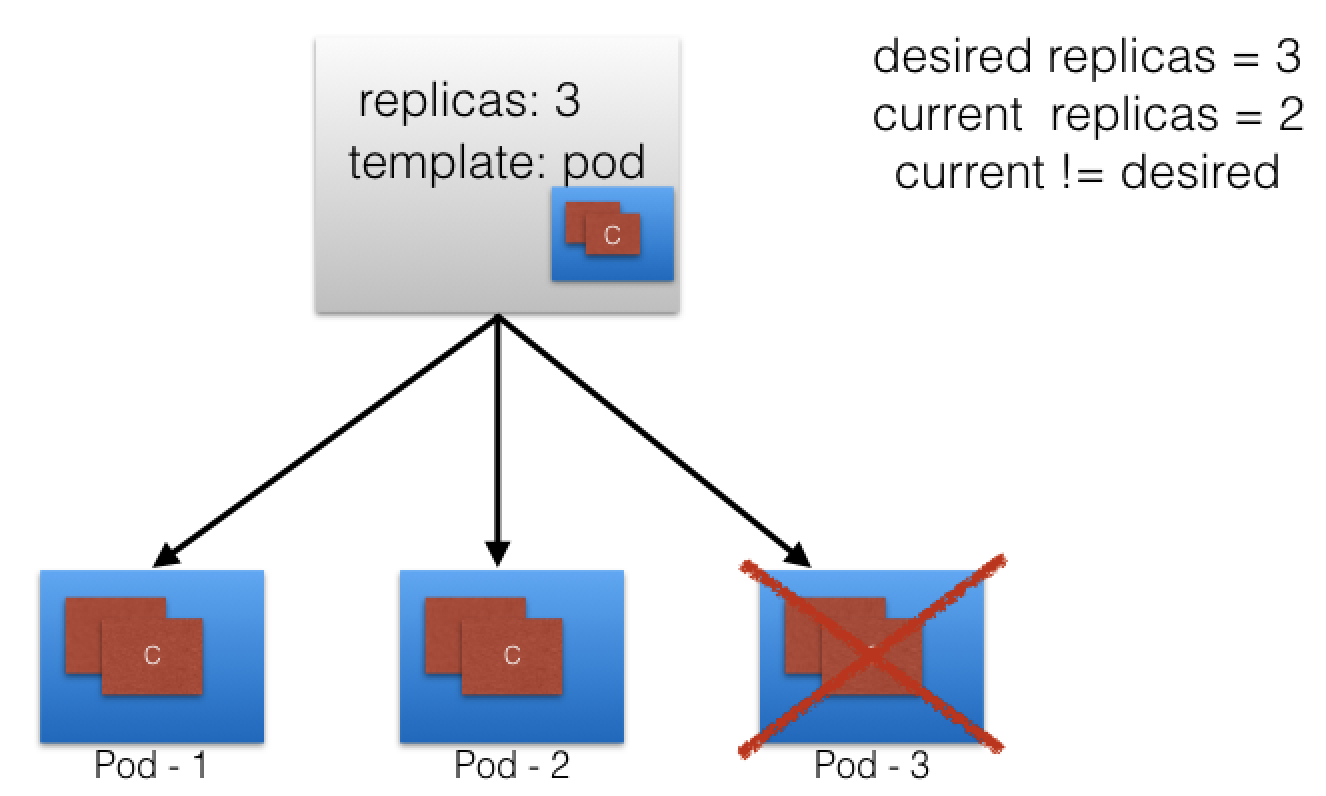
- Below we graphically represent a ReplicaSet, with the replica count set to 3 for a specific Pod template. Pod-1, Pod-2, and Pod-3 are identical, running the same application container image, being cloned from the same Pod template.
- For now, the current state matches the desired state. Keep in mind, however, that although the three Pod replicas are said to be identical - running an instance of the same application, same configuration, they are still distinct in identity - Pod name, IP address, and the Pod object ensures that the application can be individually placed on any worker node of the cluster as a result of the scheduling process.
- Below is an example of a ReplicaSet object’s definition manifest in YAML format:
apiVersion: apps/v1
kind: ReplicaSet
metadata:
  name: frontend
  labels:
    app: guestbook
    tier: frontend
spec:
  replicas: 3
  selector:
    matchLabels:
      tier: frontend
  template:
    metadata:
      labels:
        tier: frontend
    spec:
      containers:
      - name: php-redis
        image: gcr.io/google_samples/gb-frontend:v3
- Let’s continue with the same ReplicaSet example and assume that one of the Pods is forced to unexpectedly terminate (due to insufficient resources, timeout, its hosting node has crashed, etc.), causing the current state to no longer match the desired state.
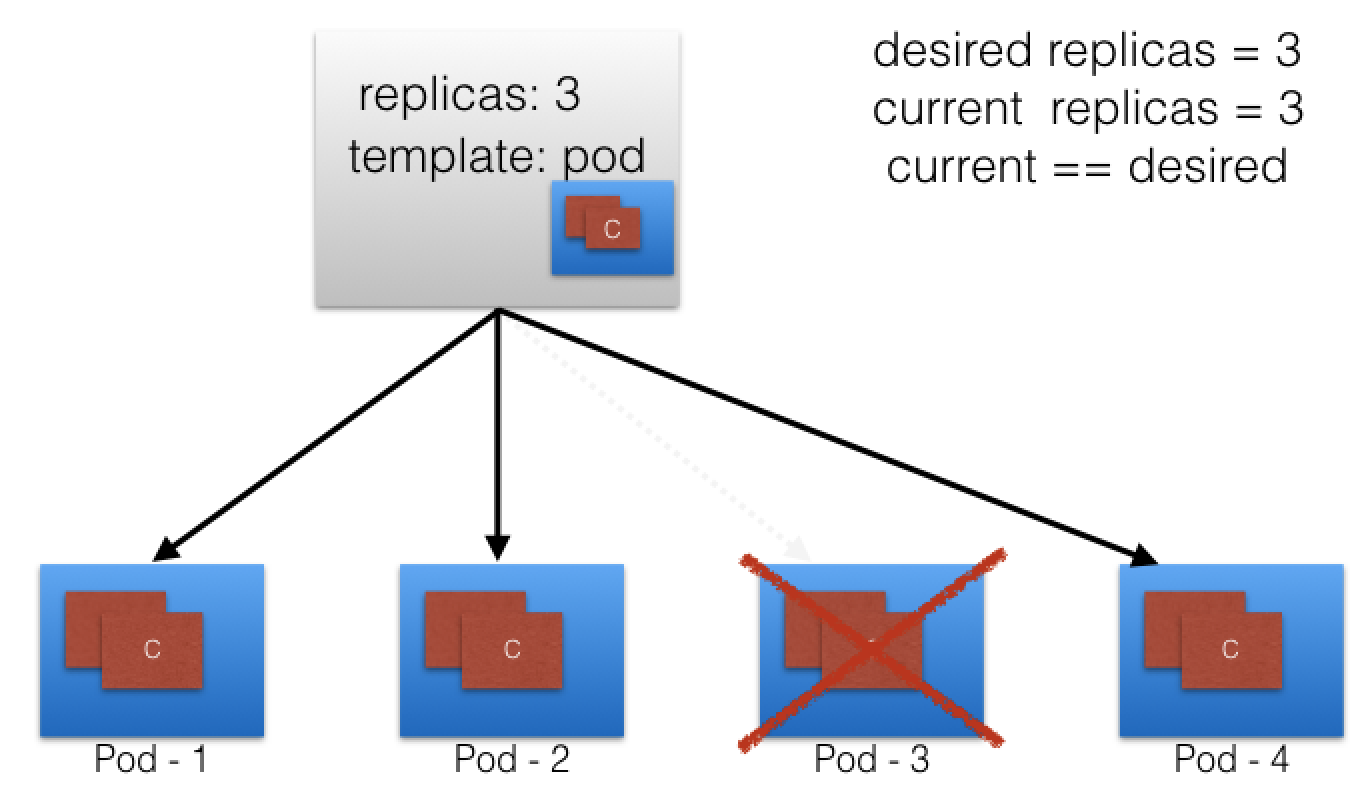
- The ReplicaSet detects that the current state is no longer matching the desired state and triggers a request for an additional Pod to be created, thus ensuring that the current state matches the desired state.
- ReplicaSets can be used independently as Pod controllers but they only offer a limited set of features. A set of complementary features are provided by Deployments, the recommended controllers for the orchestration of Pods.
- Deployments manage the creation, deletion, and updates of Pods.
- A Deployment automatically creates a ReplicaSet, which then creates a Pod. There is no need to manage ReplicaSets and Pods separately, the Deployment will manage them on our behalf.
- We will take a closer look at Deployments next.
Deployment
-
Deployment objects provide declarative updates to Pods and ReplicaSets.
-
The DeploymentController is part of the control plane node’s controller manager, and as a controller it also ensures that the current state always matches the desired state of our running containerized application.
-
It allows for seamless application updates and rollbacks, known as the default RollingUpdate strategy, through rollouts and rollbacks, and it directly manages its ReplicaSets for application scaling.
-
It also supports a disruptive, less popular update strategy, known as Recreate.
-
Below is an example of a Deployment object’s definition manifest in YAML format:
apiVersion: apps/v1
kind: Deployment
metadata:
  name: nginx-deployment
  labels:
    app: nginx-deployment
spec:
  replicas: 3
  selector:
    matchLabels:
      app: nginx-deployment
  template:
    metadata:
      labels:
        app: nginx-deployment
    spec:
      containers:
      - name: nginx
        image: nginx:1.7.9
        ports:
        - containerPort: 80
- The apiVersion field is the first required field, and it specifies the API endpoint on the API server which we want to connect to; it must match an existing version for the object type defined.
- The second required field is kind, specifying the object type - in our case it is Deployment, but it can be Pod, ReplicaSet, Namespace, Service, etc.
- The third required field metadata, holds the object’s basic information, such as name, annotations, labels, namespaces, etc.
- Our example shows two spec fields (spec and spec.template.spec).
- The fourth required field spec marks the beginning of the block defining the desired state of the Deployment object.
- In our example, we are requesting that 3 replicas, that is 3 instances of the Pod, are running at any given time.
- The Pods are created using the Pod Template defined in
spec.template. - A nested object, such as the Pod being part of a Deployment, retains its metadata and spec and loses its own apiVersion and kind - both being replaced by template.
- In
spec.template.spec, we define the desired state of the Pod. Our Pod creates a single container running the nginx:1.7.9 image from Docker Hub. - Once the Deployment object is created, the Kubernetes system attaches the status field to the object and populates it with all necessary status fields.
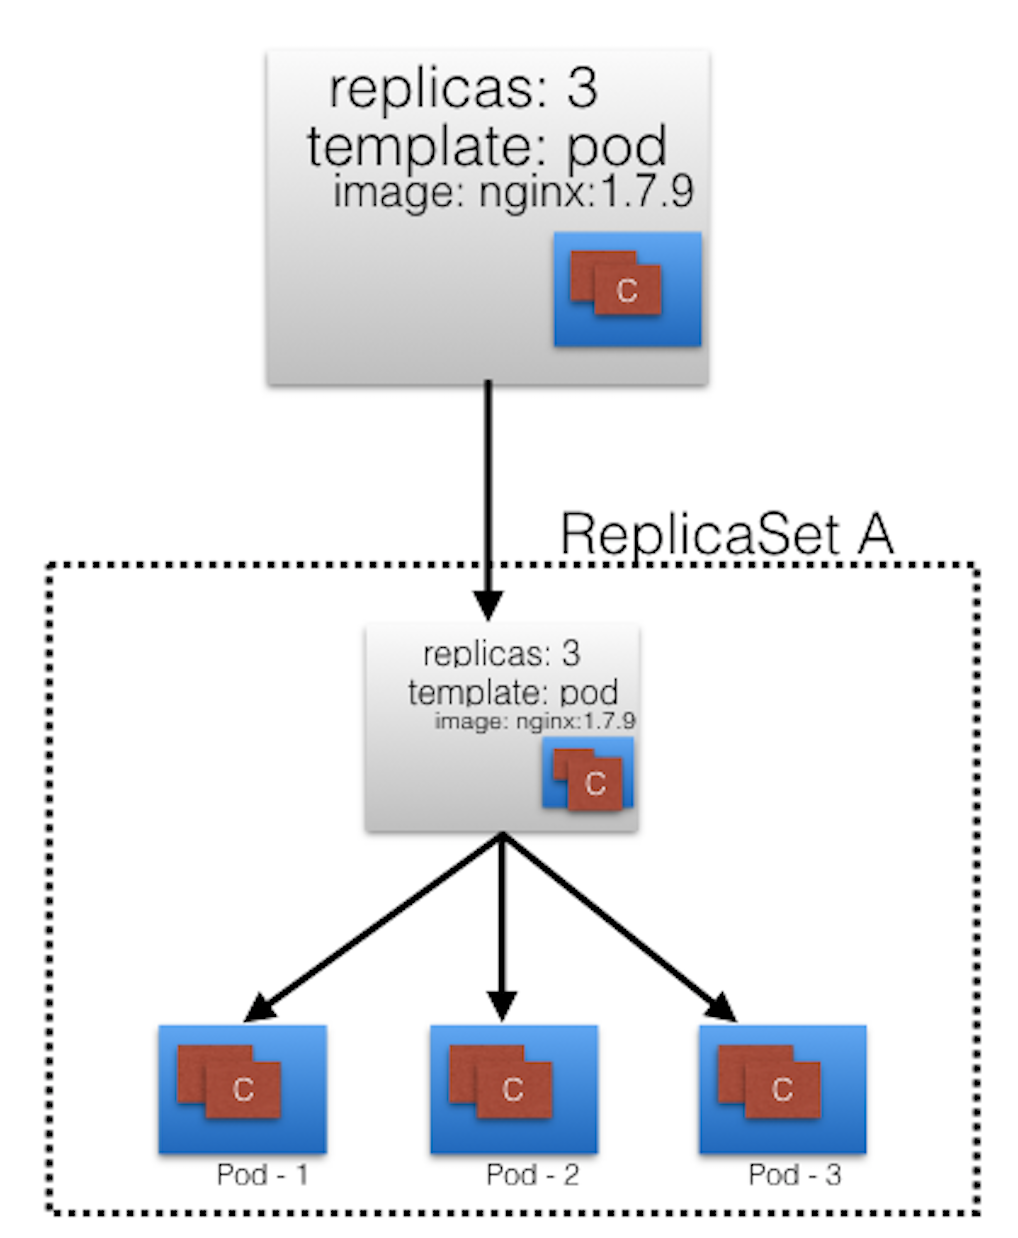
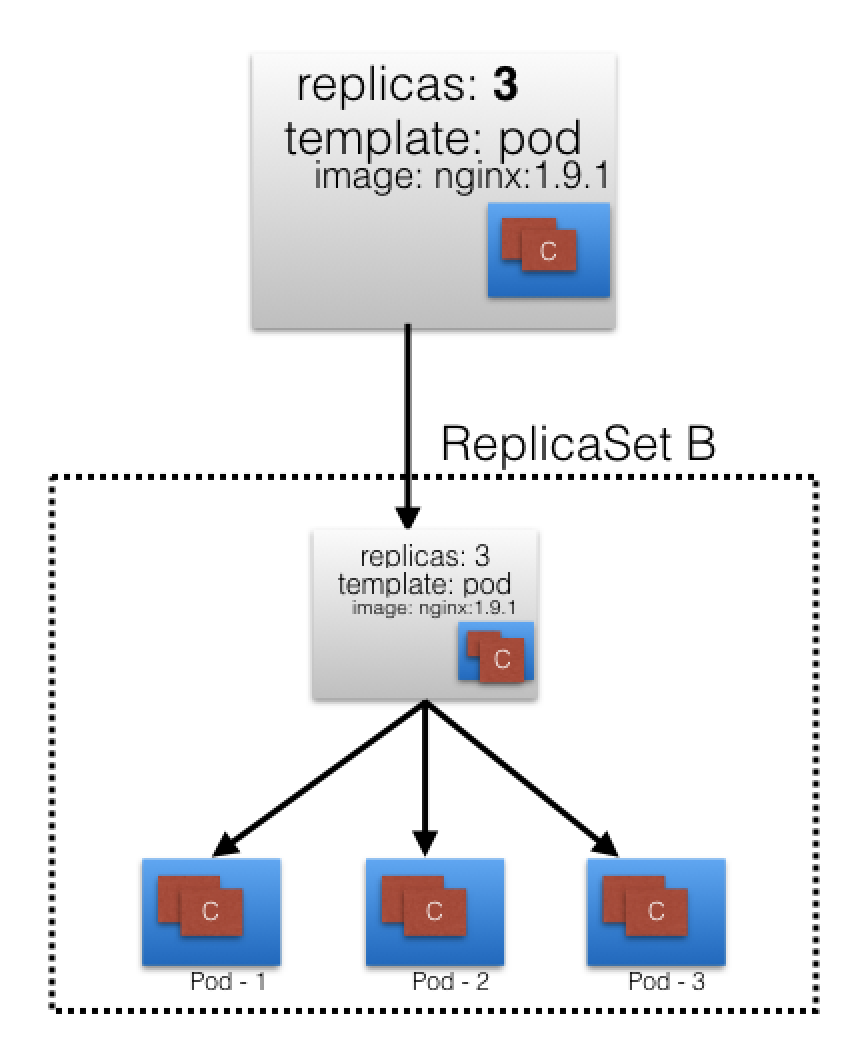
- In the following example, a new Deployment creates
ReplicaSet Awhich then creates 3 Pods, with each Pod Template configured to run onenginx:1.7.9container image. - In this case, the
ReplicaSet Ais associated withnginx:1.7.9representing a state of the Deployment. This particular state is recorded asRevision 1.
- In time, we need to push updates to the application managed by the Deployment object.
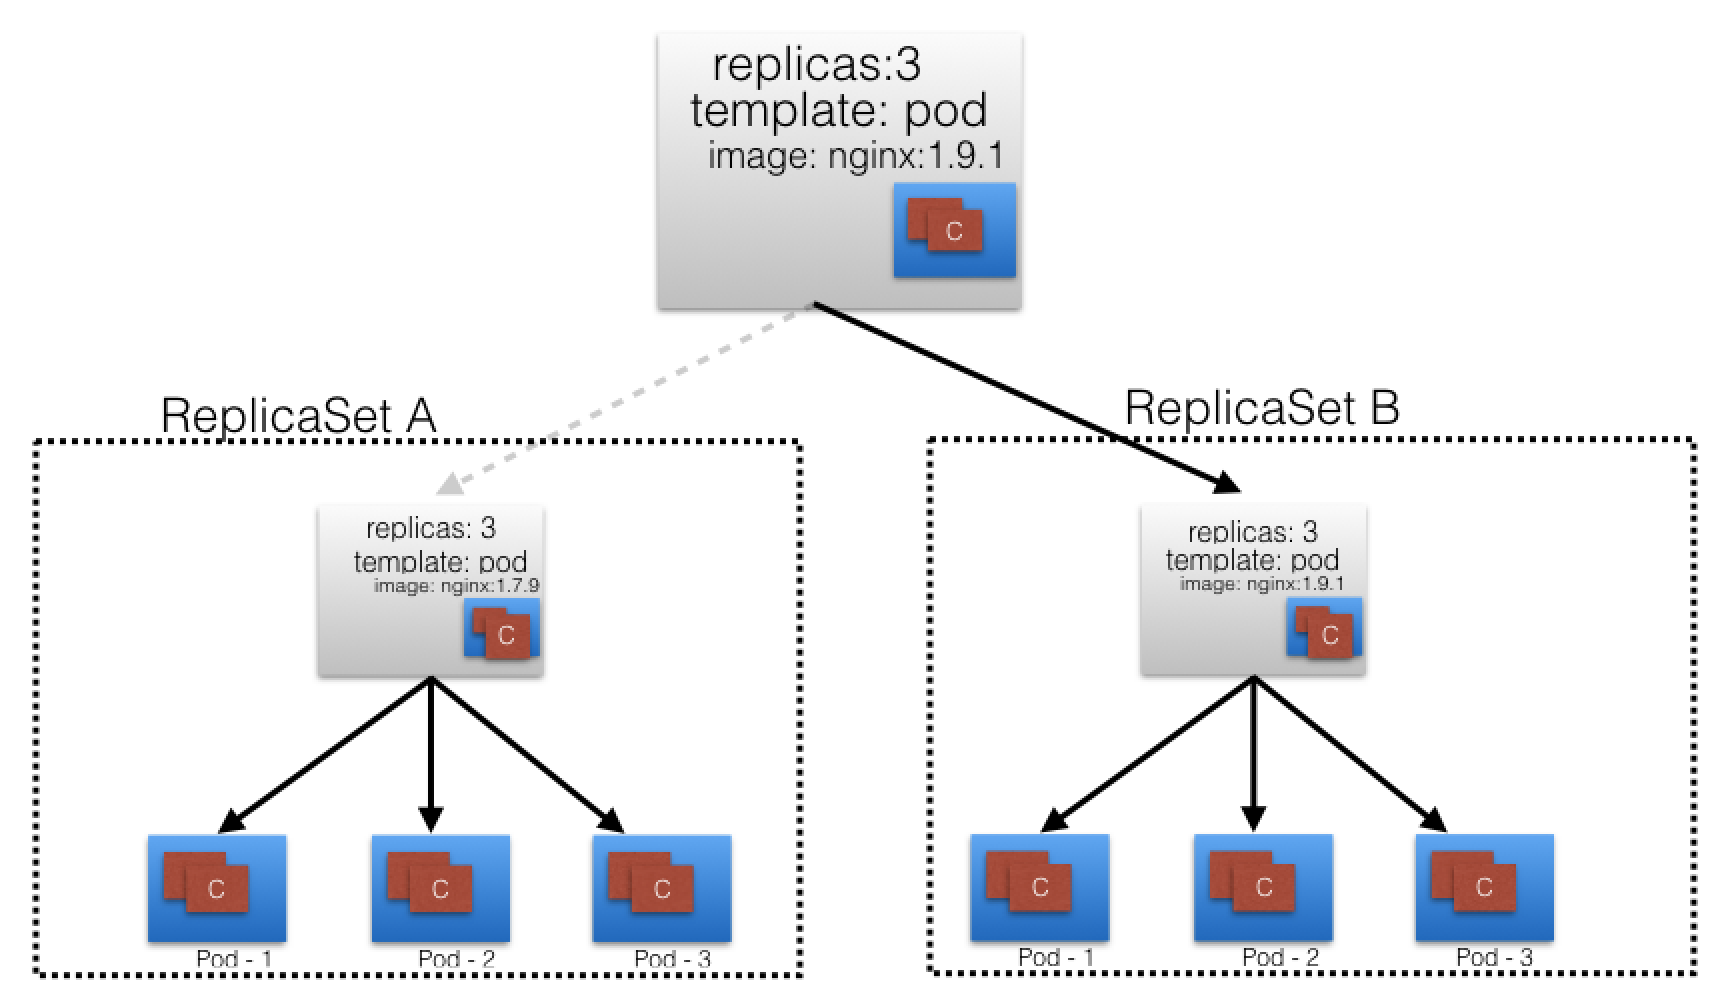
- Let’s change the Pods' Template and update the container image from
nginx:1.7.9tonginx:1.9.1. - The Deployment triggers a new
ReplicaSet Bfor the new container image versioned 1.9.1 and this association represents a new recorded state of the Deployment,Revision 2. The seamless transition between the two ReplicaSets, fromReplicaSet Awith three Pods versioned 1.7.9 to the newReplicaSet Bwith three new Pods versioned 1.9.1, or fromRevision 1toRevision 2, is a Deployment rolling update. - A rolling update is triggered when we update specific properties of the Pod Template for a deployment.
- While planned changes such as updating the
container image,container port,volumes, andmountswould trigger a new Revision, other operations that are dynamic in nature, likescalingorlabelingthe deployment, do not trigger a rolling update, thus do not change the Revision number. - Once the rolling update has completed, the Deployment will show both ReplicaSets A and B, where A is scaled to 0 (zero) Pods, and B is scaled to 3 Pods.
- This is how the Deployment records its prior state configuration settings, as Revisions.
- Once ReplicaSet B and its 3 Pods versioned 1.9.1 are ready, the Deployment starts actively managing them.
- However, the Deployment keeps its prior configuration states saved as Revisions which play a key factor in the rollback capability of the Deployment - returning to a prior known configuration state.
- In our example, if the performance of the new
nginx:1.9.1is not satisfactory, the Deployment can be rolled back to a prior Revision, in this case from Revision 2 back to Revision 1 runningnginx:1.7.9once again.
Deployment Rolling Update and Rollback (Demo)
DaemonSets
- DaemonSets are operators designed to manage node agents.
- They resemble ReplicaSet and Deployment operators when managing multiple Pod replicas and application updates, but the DaemonSets present a distinct feature that enforces a single Pod replica to be placed per Node, on all the Nodes.
- In contrast, the ReplicaSet and Deployment operators by default have no control over the scheduling and placement of multiple Pod replicas on the same Node.
- DaemonSet operators are commonly used in cases when we need to collect monitoring data from all Nodes, or to run a storage, networking, or proxy daemons on all Nodes, to ensure that we have a specific type of Pod running on all Nodes at all times.
- They are critical API resources in multi-node Kubernetes clusters.
- The kube-proxy agent running as a Pod on every single node in the cluster, or the Calico networking node agent implementing the Pod networking across all nodes of the cluster, they are both examples of applications managed by DaemonSet operators.
- Whenever a Node is added to the cluster, a Pod from a given DaemonSet is automatically placed on it.
- Although it ensures an automated process, the DaemonSet’s Pods are placed on all cluster’s Nodes by the controller itself, and not with the help of the default Scheduler.
- When any one Node crashes or it is removed from the cluster, the respective DaemonSet operated Pods are garbage collected. If a DaemonSet is deleted, all Pod replicas it created are deleted as well.
- The placement of DaemonSet Pods is still governed by scheduling properties which may limit its Pods to be placed only on a subset of the cluster’s Nodes.
- This can be achieved with the help of Pod scheduling properties such as nodeSelectors, node affinity rules, taints and tolerations.
- This ensures that Pods of a DaemonSet are placed only on specific Nodes, such as workers if desired. However, the default Scheduler can take over the scheduling process if a corresponding feature is enabled, accepting again node affinity rules.
- Below is an example of a DaemonSet object’s definition manifest in YAML format:
apiVersion: apps/v1
kind: DaemonSet
metadata:
  name: fluentd-agent
  namespace: kube-system
  labels:
    k8s-app: fluentd-agent
spec:
  selector:
    matchLabels:
      k8s-app: fluentd-agent
  template:
    metadata:
      labels:
        k8s-app: fluentd-agent
    spec:
      containers:
      - name: fluentd-agent
        image: quay.io/fluentd_elasticsearch/fluentd:v2.5.2
Managing Node Applications with DaemonSets (Demo)
Services
- A containerized application deployed to a Kubernetes cluster may need to reach other such applications, or it may need to be accessible by other applications and possibly clients.
- This is problematic because the container does not expose its ports to the cluster’s network, and it is not discoverable either.
- The solution would be a simple port mapping, as offered by a typical container host.
- However, due to the complexity of the Kubernetes framework, such a simple port mapping is not that “simple”.
- The solution is much more sophisticated, with the involvement of the kube-proxy node agent, IP tables, routing rules, cluster DNS server, all collectively implementing a micro-load balancing mechanism that exposes a container’s port to the cluster, even to the outside world if desired.
- This mechanism is called a Service, and it is the recommended method to expose any containerized application to the Kubernetes network.
- The benefits of the Kubernetes Service becomes more obvious when exposing a multi-replica application, when multiple containers running the same image need to expose the same port.
- This is where the simple port mapping of a container host would no longer work, but the Service would have no issue implementing such a complex requirement.
- This is only a brief introduction of the Kubernetes Service resource. Services, their types, configuration options, and more will be discussed in a later chapter.
Learning Objectives (Review)
By the end of this chapter, you should be able to:
- Describe the Kubernetes object model.
- Discuss Kubernetes building blocks, e.g. Nodes, Namespaces, Pods, ReplicaSets, Deployments, DaemonSets.
- Discuss Labels and Selectors.